Animation Production
“Fail to Prepare, Prepare to Fail” — My Hard-Ass Swimming Coach
What is Animation Production?
Production is broadly speaking the entire process of producing animation.
However the role of Producer(s) is to manage this process.
Taking a broad view of production, producers plan for and track a project progress. Should issues begin to arise in a production, the producer will notice it before it becomes a problem. Then through discussion with Directors and the creative team come up will adjust the production plan to avoid any issues.
In larger teams this ‘management’ role may be headed by a Production Manager or Line Producer, whilst funding and broader project logistics fall to the Producer. However for smaller productions a producer would generally cover both.
A producer knows the shape of the work before it starts
- How many shots are being created (Shot List)
- What assets are needed in each shot (Asset List)
- What steps are involved in each shot and the project (Task List)
- The project timeline and when tasks are due (Project Schedule)
- When each team member works which task (Working Schedule)
Production Documents
In the process of managing a production there a few different types of core documents we can use to manage, track and plan a production.
Schedules
A key production document that plans out when certain tasks will be completed. Schedules will often be divided into one for a broad view of the whole project timeline (Project Schedule) and another for more week to week work planning (Working Schedule)
Lists (Tasks, Assets, Shots..)
These documents name and itemise all the components that need to be created or made to fully complete a project. They are vital to understanding the scope of work.
Production Documents
Trackers (Tasks, Assets, Shots..)
These documents specifically track the progress and status of a given component in production. How complete is it, has it started, does it need to be reviewed etc.
Working with production documents may seem a little unappealing at first but ultimately they are the tools to ensure that a production runs smoothly. A production where everyone gets paid, doesn’t have to overwork and the project is finished on time. Pretty appealing prospects in my opinion!
Whether you work in a studio or even more so if you go the independent/freelance route, you need to know these skills!
Production Document Template
Please find a link to the template document here. Please make a copy and use as you please.
Pipeline
The Path to the Final Frame
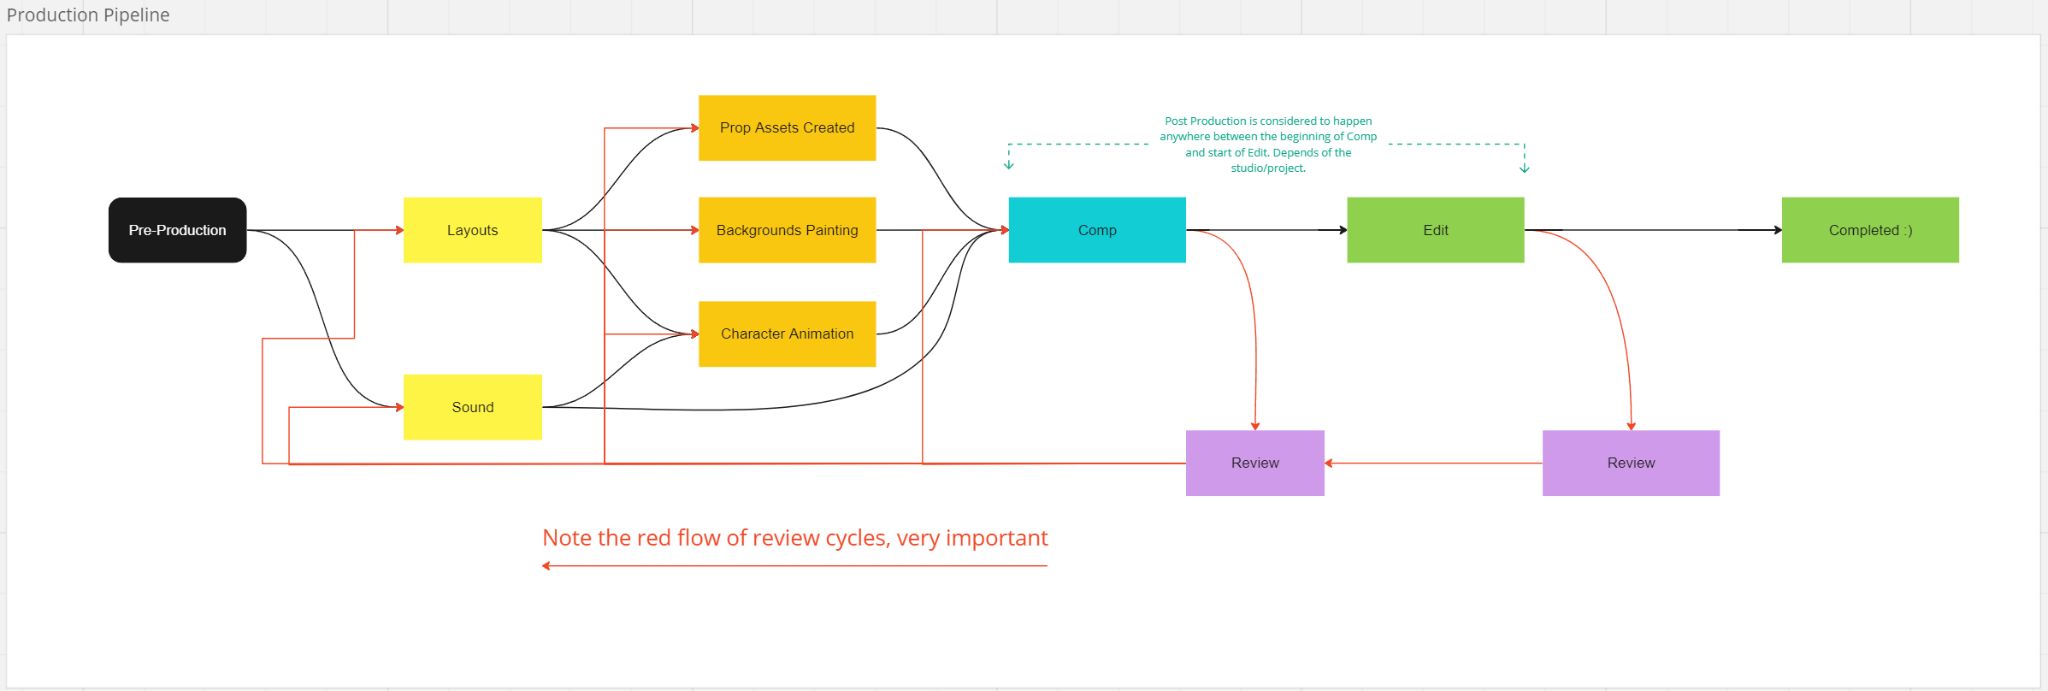
Pipeline is the steps, and the flow between them
- The blocks are the steps and the arrows are the flow
- The red lines mark the review cycle
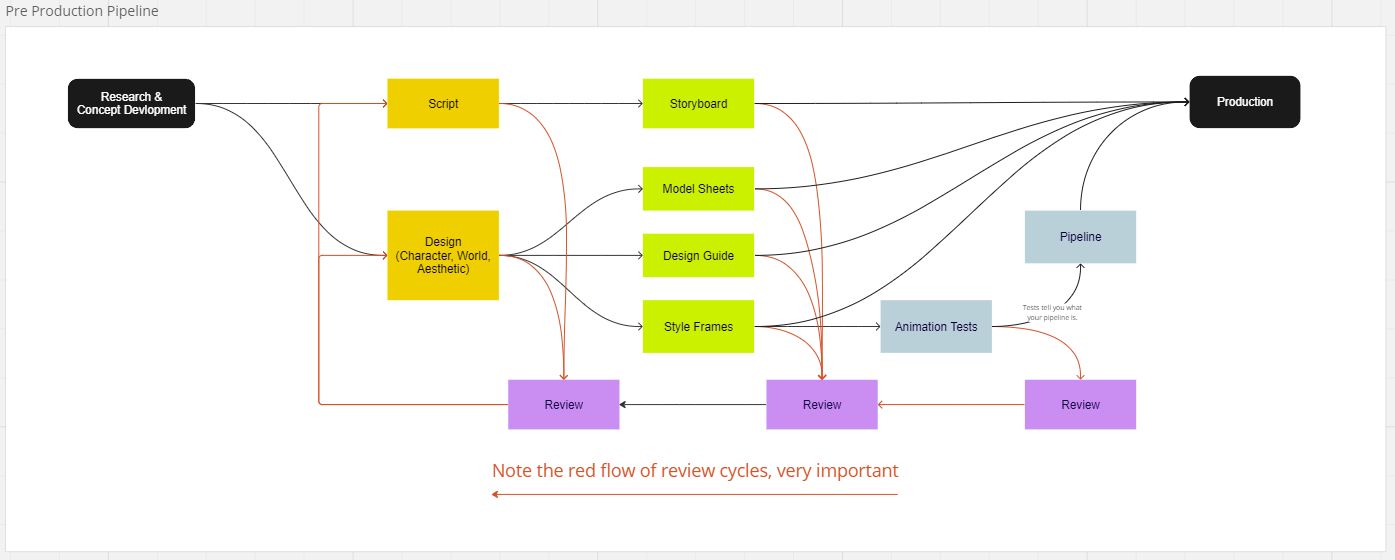
An example pre-production pipeline
- Research and concept lead into script and design
- Storyboards, model sheets and style frames follow
- Reviews run throughout, not just at the end
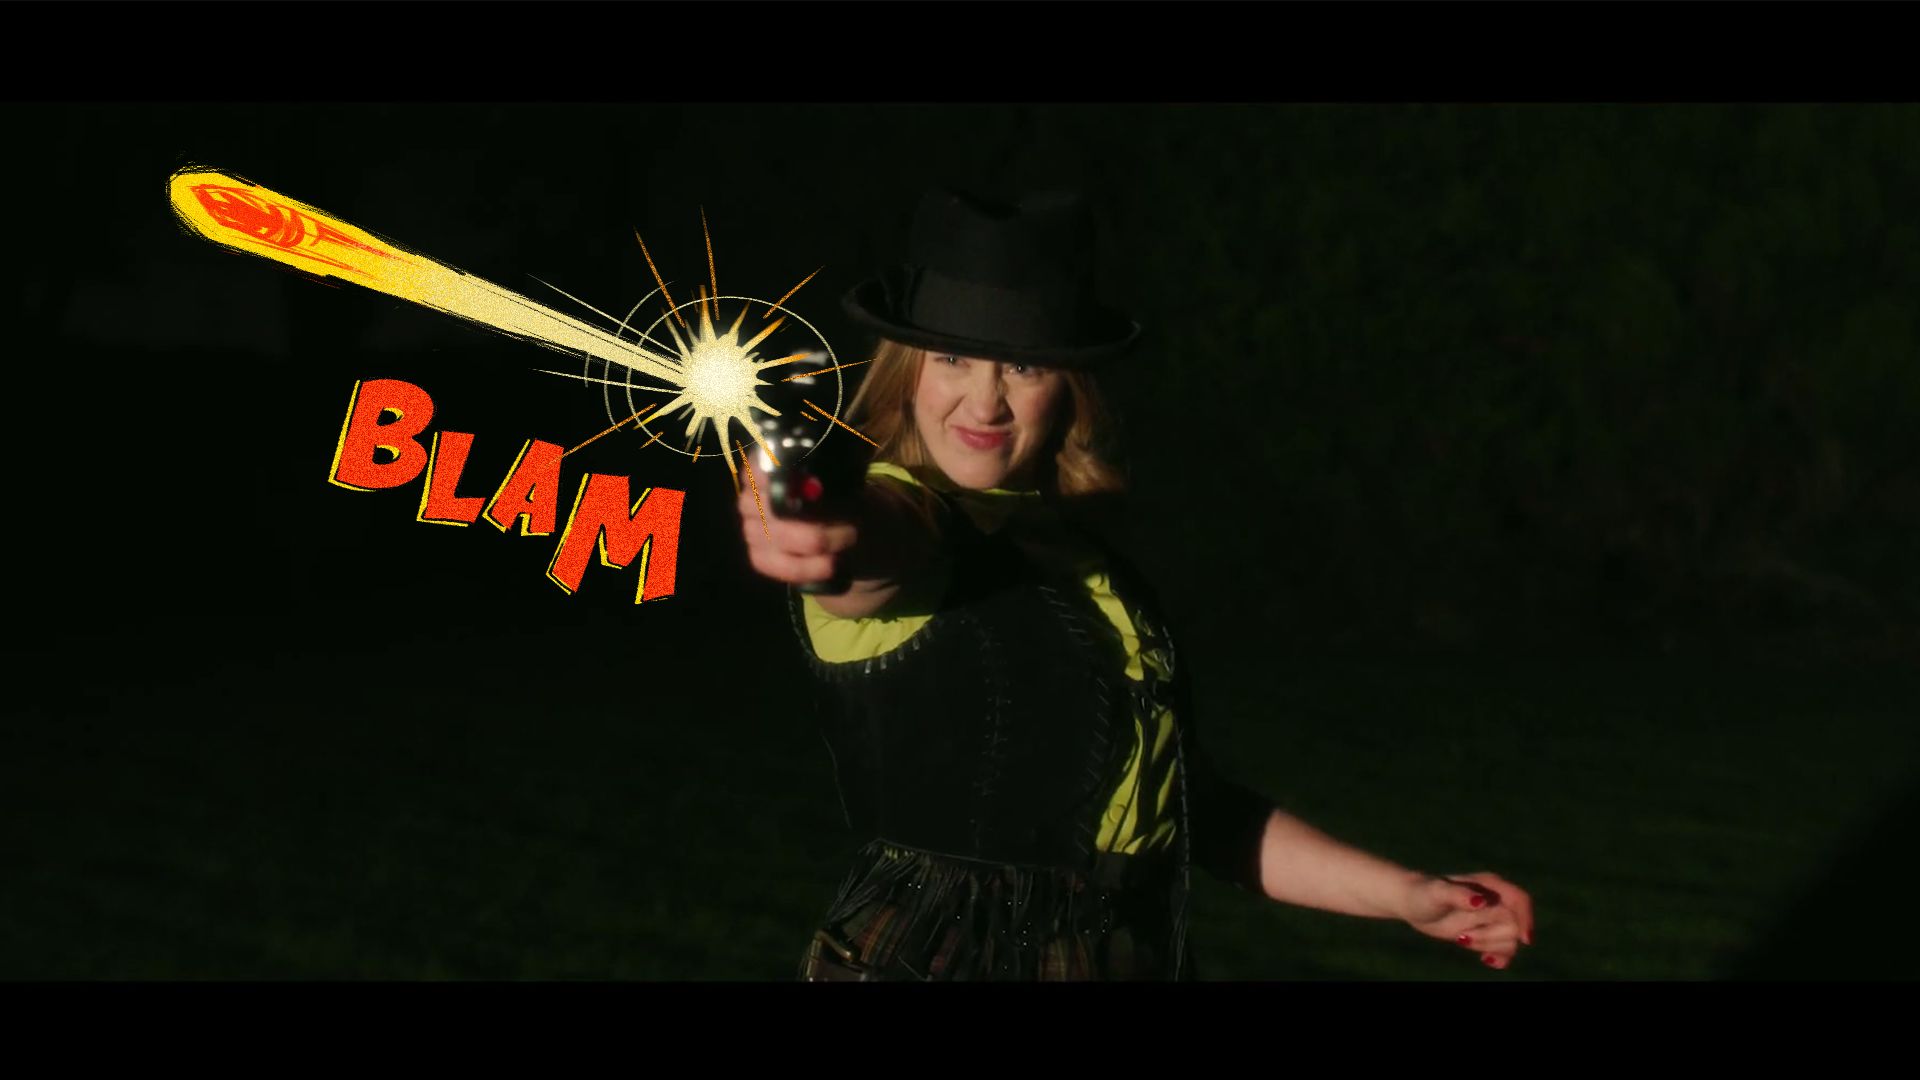
A style frame previews the shot before you build it
- A style frame is a single, finished-looking frame from a shot
- It helps you list the assets and pipeline the shot will need
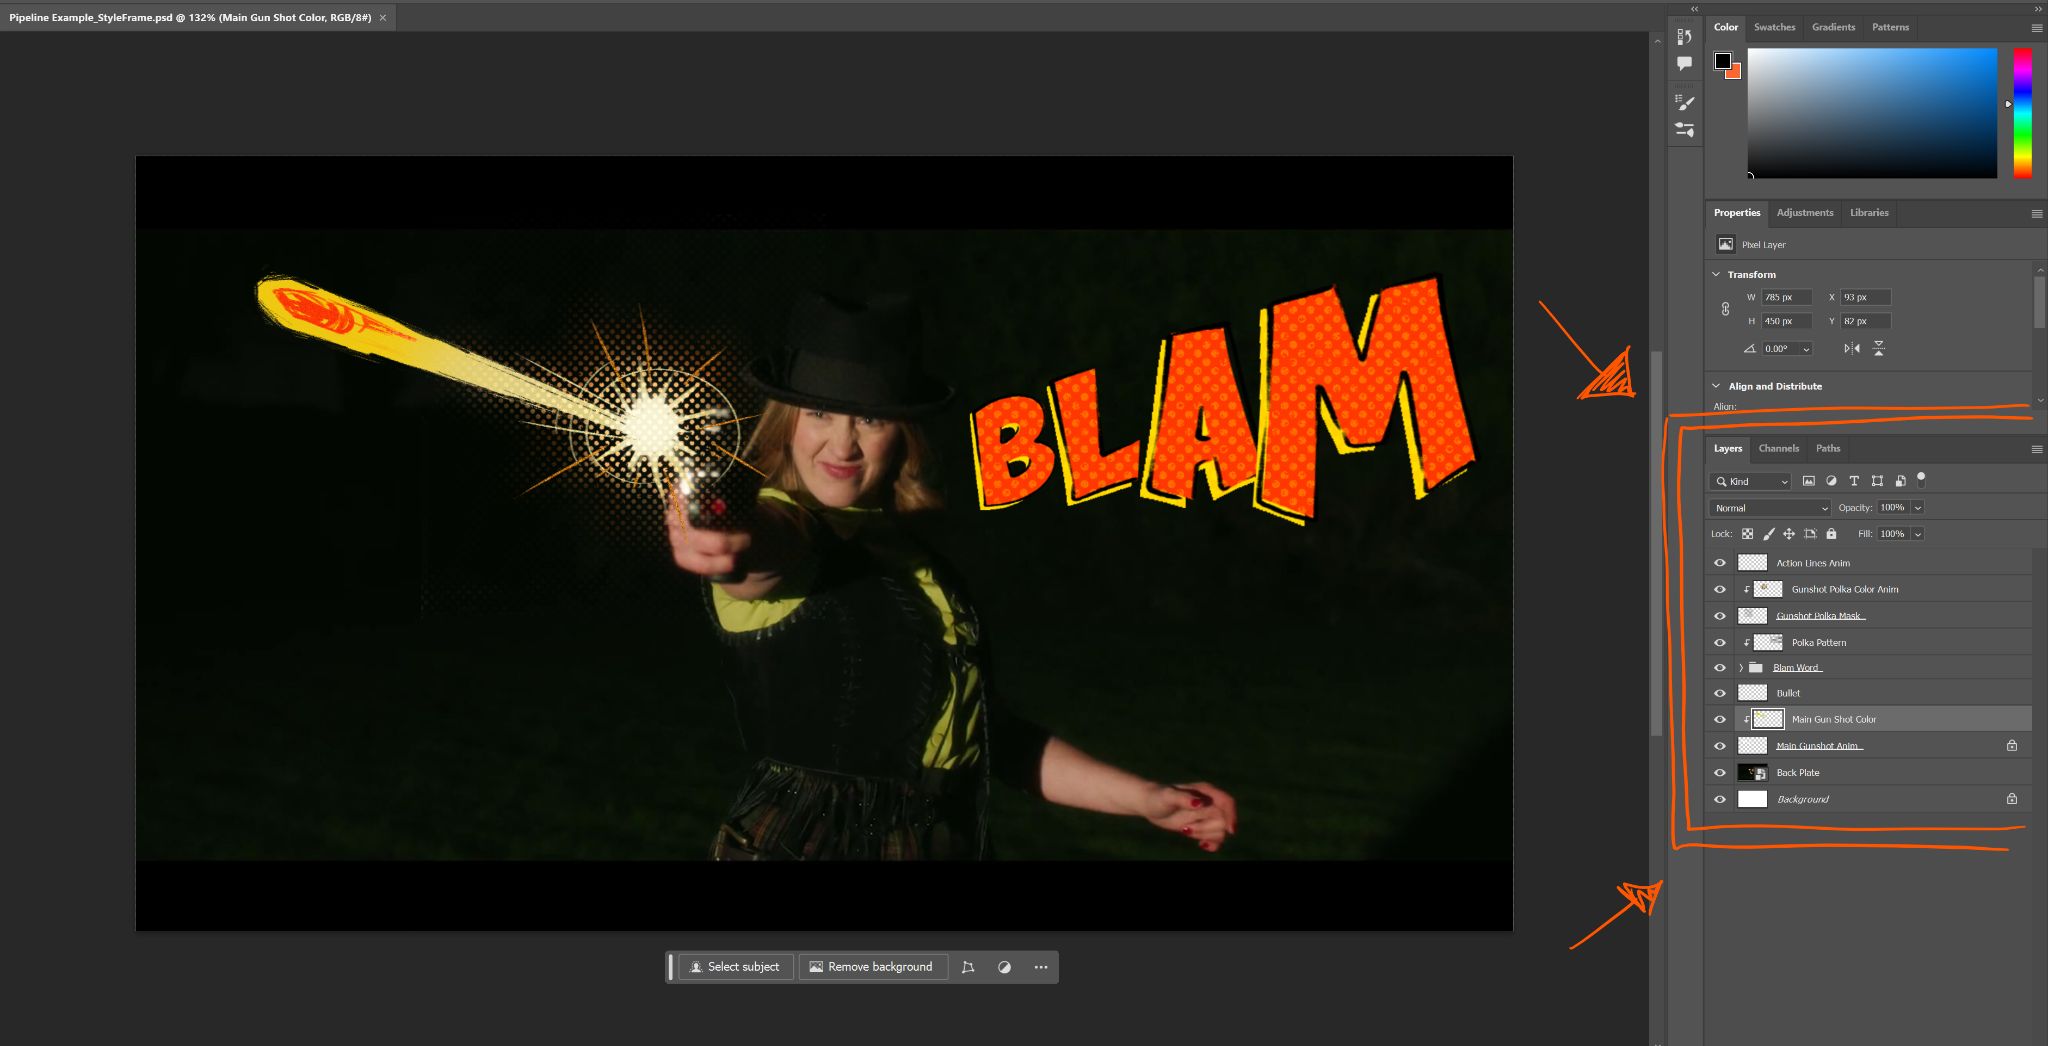
Test early — don’t waste time on assets that won’t work
- Clean up your layers so you can see what assets you actually need
- Test camera moves and effects in AE before making final assets
- Big timesaving step: test, test, test!
All Things Technical
The nitty-gritty things that will make or break a big project.
File Naming
An example of one I use all the time and can recommend is the following:
Notice how the naming convention has a descending order of logic as we grow more specific on what it is. We will use this same logic to organise our folders, which we will cover later.
Folder Structure
Then our folder structure could simply be as follows:
Folder Structure
With that in mind, the following assets will be stored in the following locations:
Folder Structure
will be stored in
Before proceeding, it is important to highlight the difference between Work files and Assets
Work files: Are the files we use to create the work eg. blend, .tvpp, .psd, .aep etc.
Assets: Are the files we export from the work files to the next step of the pipeline eg. .png, .mov, .wav. They are static images, sequences, sounds etc. the ingredients to the project.
Example Folder Structure
Please find a link to an example folder structure here which you can use and build open
Cloud Project Folders
In practice we may likely be working between more than one computer or indeed working with more than one individual, where in each instance someone needs access to the project folder from a different machine. Having a project folder on a single drive somewhere simply won’t work, so the best solution is to setup a cloud project folder. This way anybody working on the project can easily update and assets from the project.
No more sending and downloading files! Imagine that, the files just appear on your computer or in your software. This is the way.
You can do this with Microsoft OneDrive or Google Drive, as both of these will create a local filepath for you to use. The reason they work is that they create a local filepath for softwares to reference assets from.
Cloud Project Folders
For example I’m a background artist and I’ve finished my asset for the day ‘MP_SH01_BG_Sea.png’ and I’m going to save it to MyProject\Shots\SH01\BG. The local filepath here is actually the full name and address of the file which would be something like:
‘C:\Work\MyProject\Shots\SH01\BG\MP_SH01_BG_Sea.png’
This filepath is where our programs save files to and where they look for files when they are referenced assets like in the case of AE or Premiere. So by having the same local paths on many machines our softwares can see and use this cloud folder seamlessly.
For both OneDrive and G Drive you will need to download a desktop app to access these local filepaths.
Setting up OneDrive cloud project folder
For OneDrive you can download the app here and once installed you will then setup up your folder in the top level of your OneDrive, such that you will end up with a filepath something like this:
‘C:\OneDrive\OneDrive - Dun Laoghaire Institute of Art, Design and Technology\MyProject…’
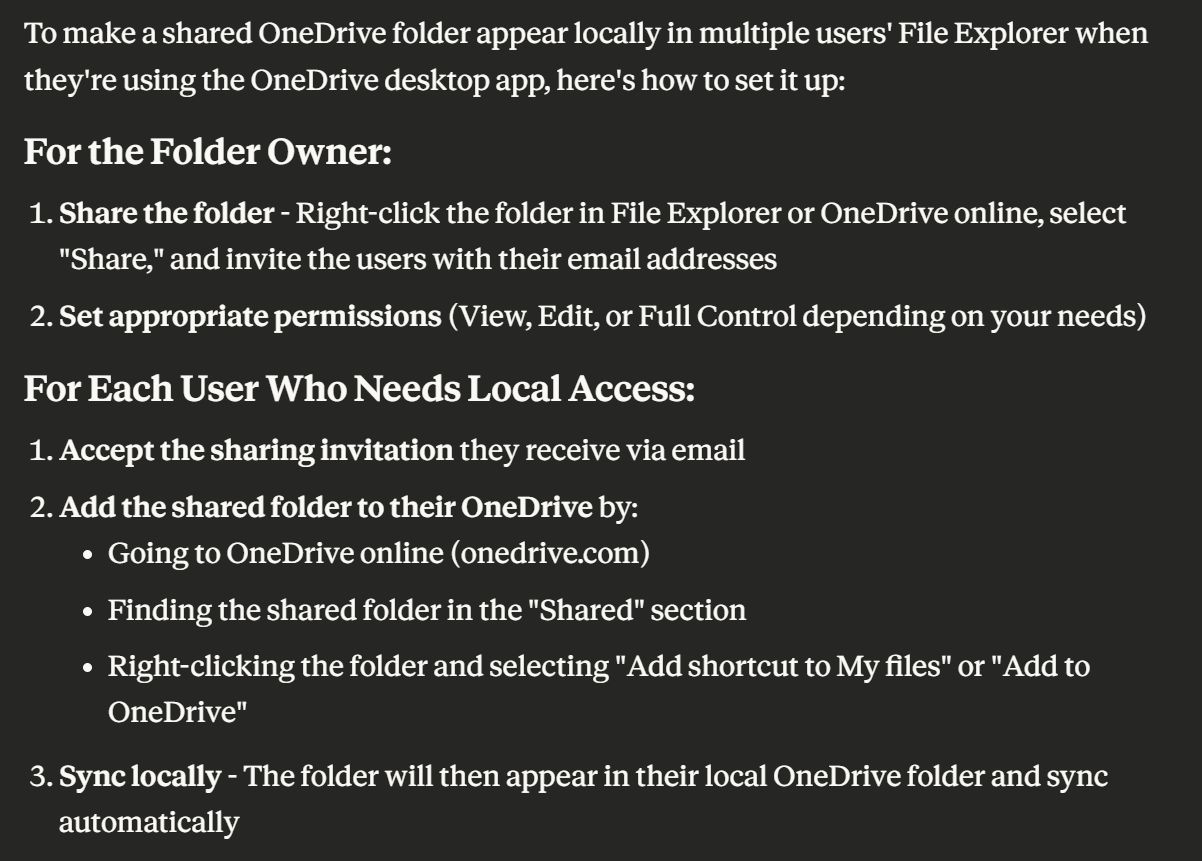
If you are working as a group you may need to do some research into how to make a shared folder appear in one anothers OneDrives as you will have separate accounts. The next slide is an unverified answer from an AI to get you started :)
As students you all have 2TB of storage on your accounts.
Setting up G Drive cloud project folder
For G Drive you can download the app here and once installed you will then setup up your project folder in the top level of your G Drive. With G Drive it sees itself as a separate drive to your main one (ie. ‘C:’) so you can give it it’s own letter. I recommend that you do and as such you would end up with a filepath something like:
‘G:\MyDrive\MyProject…’
If you are working as a group you will need to create a GMail account which each team member has access to. This way everyone uses the same account. There may be some 2FA security kinks to iron out but I’ve used this before as a team and can vouch that it works well once up and running.
You will also need to pay €10 a month for 2TB of storage.
Resolution, Aspect Ratio & Framerate
Fundamental file settings for your project which will be chosen based on the artistic and technical requirements of the project. Set these before anyone starts production and make sure all team members are using the same settings in their work files/programs!
Resolution: The exact pixel count for the width and height of your video. Common ones are 1920 x 1080 aka. HD, 3840 x 2160 aka. 4K etc.
Aspect Ratio: This is ratio of pixels from the width to height. It communicates the shape of your video, not the resolution. eg. 16:9 the common screen ratio for devices nowadays can be 1280x720, 1920x1080 and 3840x2160.
For a list of common screen ratio’s and a calculator to figure out new ones go here.
Framerate: This the amount of frames per second in a video. Depending on the look and feel you wish to have in your piece you may chose different a different fps. 24fps is the ‘filmic’ framerate, it’s often used for cinema and increasingly on streaming services. 25fps is a general standard framerate. 30fps is a smoother framerate that is used mainly for TV and YT. 60 fps is generally reserved for gaming or nature docs, many viewers find this framerate odd to watch, use with caution!
Channels & Alpha
If you don’t know what Channels and Alpha are read this.
When exporting and transferring assets be sure to be mindful if the asset needs Alpha. Animation sequences often tend to be a key example, character without background.
If so you will often need to enable the export alpha channel option in your program and sometimes also set your .png, .tiff or .mov file to have all four channels enabled, RGBA.
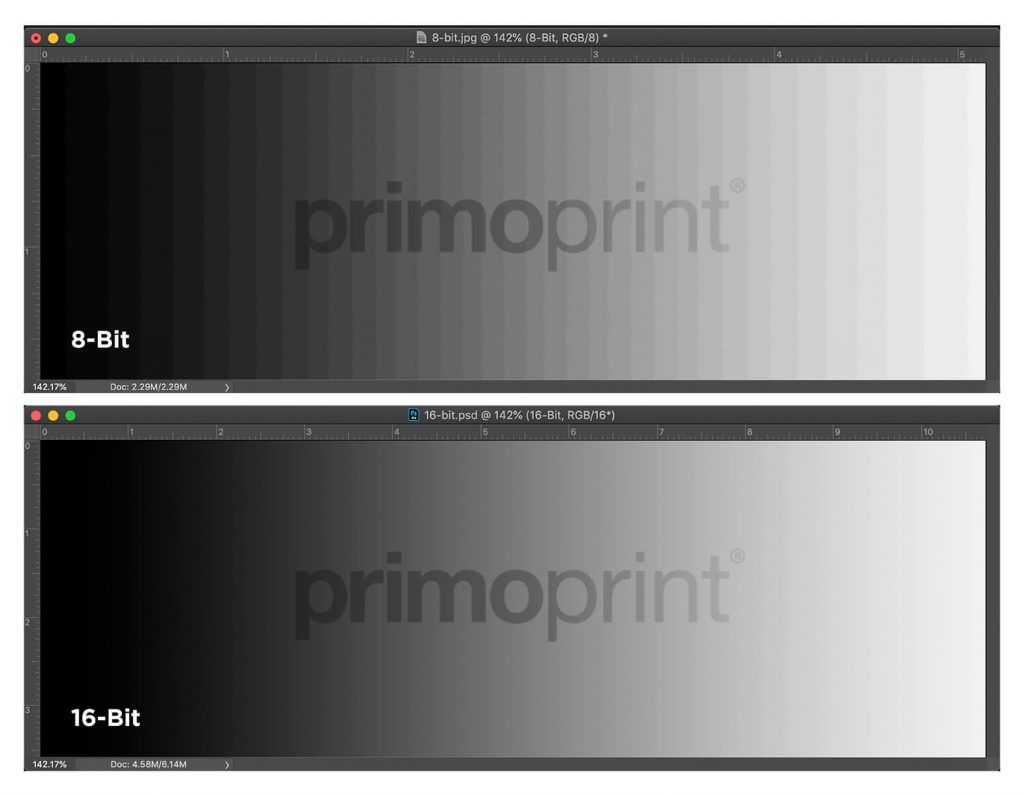
16-bit gives you far more colour information than 8-bit
- 16-bit holds 65,536 values per channel, 8-bit only 256
- More headroom for grading and soft gradients without banding
- Use 16-bit for Background & Prop assets, in PS and on export
Brief notes on Compression
In brief you have 3 types of Compression
Uncompressed: No data whatsoever is lost, every pixel, every frame, full quality and absolutely massive files! In general not to be used. eg. .mov(Animation codec)
Lossless Compression: Only non essential information is compressed, so no image quality is sacrificed and data is greatly reduced. Use this during production eg. png, .tiff, .mov(Apple ProRes 422/4444), .wav
Lossy Compression: Image quality sacrificed to extremely reduce filesize. Generally used for web optimised playback, Never to be used in production if possible. Eg. .jpeg, .mp4(H264), .mp3
Recommended file types while in production
With all that in mind here all the file types I suggest you use during production to ensure no quality lost when exporting assets
Static images assets: .png, .tiff or .psd
Video assets: .mov (with Prores 422/4444 codec, with Alpha if you need it)
Sound assets: .wav (mp3 with high bitrate is a second best)
3D files: Aside from the program specific files (.mb, .c4d or .blend) then .obj for just models, .fbx for everything else.
Filetypes for use post-production
Once you have finished these are the two ways I would recommend exporting your video for use afterwards.
Video for Web: Export an mp4. with H264 codec. This is the standard for web video playback. Bare in mind there are settings we use in Media Encoder which dictate the amount of compression/image quality loss.
HQ Video for otherwise: Use .mov with an Apple ProRes 422 codec. This is good to keep as your own HQ copy and often requested by clients, festivals etc.